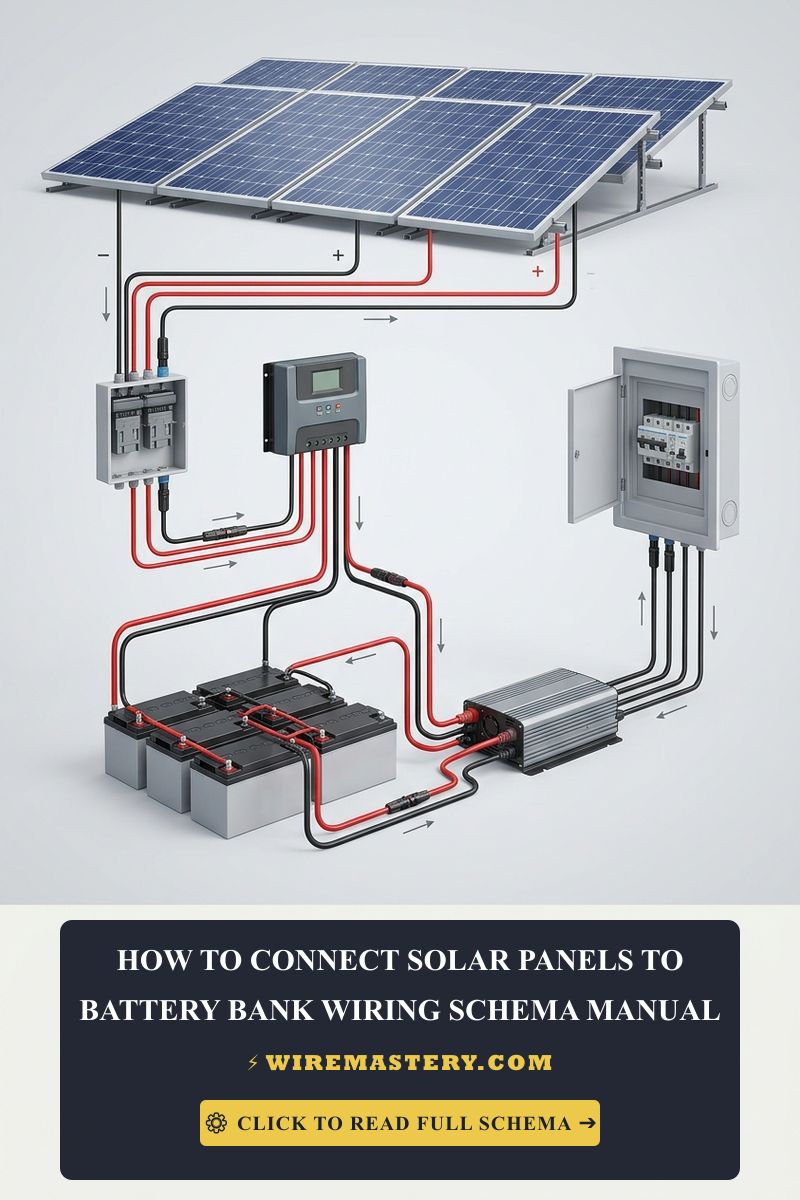
How to Connect Solar Panels to a Battery Bank: Wiring Guide
Connecting solar panels to a battery bank is a crucial aspect of building an effective solar energy system for residential use. This guide covers the entire process, from understanding the wiring schema to ensuring compliance with safety standards and regulations. By following this detailed manual, you can confidently set up your solar panel system while adhering to best practices within the electrical engineering domain.
Understanding Solar Panel and Battery Bank Connection
The Basics of Solar Energy Systems
A solar energy system typically consists of:
- Solar Panels: Convert sunlight into electricity.
- Charge Controller: Regulates the voltage and current coming from the solar panels to the battery bank.
- Battery Bank: Stores energy for use when sunlight is not available, such as at night or during cloudy weather.
- Inverter: Converts the stored DC electricity from the battery bank into AC electricity for home use.
Importance of Proper Wiring
Proper wiring ensures that your solar energy system operates efficiently, safely, and reliably. Incorrect wiring can lead to several issues including:
- System inefficiency
- Overheating and potential fire hazards
- Damage to components
- Voiding of warranties
Required Tools and Materials
Before you start, you’ll need to gather the following tools and materials:
Tools
- Wire Strippers: For preparing electrical wires.
- Screwdrivers: Flat and Phillips head for securing connections.
- Multimeter: For testing voltage and continuity.
- Drill: For installing mounting hardware if necessary.
- Wrenches: For securing battery terminals and other connections.
- Safety Goggles: Protect your eyes during installation.
- Gloves: To protect your hands from cuts and electrical shock.
Materials
- Solar Panels: Choose panels based on your energy needs.
- Battery Bank: Select deep-cycle batteries suitable for solar applications (e.g., AGM, Gel, Lithium).
- Charge Controller: Match the controller to the system voltage and battery type.
- Inverter: Ensure it’s compatible with your battery bank and load requirements.
- Wiring: Select appropriate wire gauges based on the distance and current requirements.
- Connectors: MC4 connectors for solar panels, ring terminals for battery connections, etc.
- Fuses/Circuit Breakers: For overcurrent protection.
Wiring Schema Overview
Types of Connections
- Series Connection: Increases voltage.
- Parallel Connection: Increases current.
For battery banks, you typically connect batteries in parallel to maintain the system voltage while increasing capacity.
Basic Wiring Principles
- Voltage Rating: Ensure all components are rated for the same voltage (12V, 24V, or 48V systems).
- Wire Gauge: Follow the American Wire Gauge (AWG) standards to choose the correct wire size based on current capacity and distance.
- Polarity: Always connect positive to positive and negative to negative.
Step-by-Step Wiring Instructions
Step 1: Preparing the Work Area
- Ensure the work area is clean and organized.
- Have all tools and materials within reach.
Step 2: Connecting Solar Panels to Charge Controller
- Mount the Solar Panels: Follow the manufacturer’s instructions for mounting.
- Connect Wiring:
- Use MC4 connectors to connect the solar panels to the charge controller.
- Ensure the positive lead from the solar panel connects to the positive terminal on the charge controller and the same for the negative lead.
Step 3: Connecting the Charge Controller to the Battery Bank
- Identify Battery Terminals: Locate the positive (+) and negative (-) terminals on the battery bank.
- Connect Wires:
- Use appropriately sized wires (generally 10-12 AWG) to connect the charge controller to the battery terminals.
- Connect the positive output from the charge controller to the positive terminal on the battery bank.
- Connect the negative output from the charge controller to the negative terminal on the battery bank.
Step 4: Connecting the Inverter
- Choose Inverter Location: Install the inverter close to the battery bank to minimize voltage drop.
- Connect Battery to Inverter:
- Use heavy-duty cables (typically 6-8 AWG) to connect the inverter’s battery input to the battery terminals.
- Connect the positive terminal of the inverter to the positive terminal of the battery and the negative to the negative terminal.
Step 5: Final Wiring and Safety Checks
- Double-Check Connections: Ensure all connections are tight and secure.
- Install Fuses/Circuit Breakers: Place them on the positive side of the battery connection to protect against overcurrent.
- Test the System:
- Use a multimeter to verify voltage at various points in the system.
- Check for proper operation of the charge controller and inverter.
Safety Checklist
- Turn off all power sources before starting work.
- Use insulated tools to prevent electrical shock.
- Wear safety goggles and gloves at all times.
- Ensure proper ventilation when working with batteries to prevent gas buildup.
- Keep flammable materials away from the work area.
- Label all wires clearly to avoid confusion during future maintenance.
Wire Gauges and Current Ratings
Selecting the correct wire gauge is crucial for safety and efficiency. Here’s a quick reference table for wire gauges based on current:
| Current (Amps) | Wire Gauge (AWG) |
|---|---|
| Up to 10 | 14 |
| 11 to 15 | 12 |
| 16 to 20 | 10 |
| 21 to 30 | 8 |
| 31 to 40 | 6 |
| 41 to 55 | 4 |
Voltage Drop Consideration
When running long distances, consider voltage drop. The following formula can help determine the acceptable voltage drop:
Voltage Drop = (2 × Length (ft) × Current (A) × Resistance (Ω/ft)) / 1000
Aim for a voltage drop of less than 3% for efficiency.
NEC Compliance & Official Safety Standards
Understanding and adhering to the National Electrical Code (NEC) is essential when installing any electrical system, including solar panel systems. The NEC provides guidelines to ensure safety and reliability in electrical installations. Compliance with these regulations helps prevent electrical hazards, ensures proper grounding, and maintains the integrity of the electrical system.
For further information and to verify current residential safety enforcement, visit the Official NFPA 70: National Electrical Code (NEC).
Final Summary
Connecting solar panels to a battery bank is a rewarding project that can significantly reduce energy costs and promote sustainability. This guide provides a comprehensive overview of the necessary tools, materials, and step-by-step instructions for a successful installation. Always prioritize safety, follow NEC guidelines, and consult with a professional if you are unsure about any aspect of the installation. By doing so, you can ensure that your solar energy system operates effectively and safely for years to come.







