Lutron vs. Leviton Smart Dimmers: Residential Wiring Comparison
When it comes to modernizing your home’s lighting system, smart dimmers provide a perfect blend of convenience, energy efficiency, and aesthetic appeal. Among the leading brands in this category, Lutron and Leviton have established their dominance with innovative products that cater to various needs and preferences.
This guide delves into a detailed comparison of Lutron and Leviton smart dimmers, focusing on their residential wiring requirements, neutral wire dependencies, multi-location installations, and strict adherence to National Electrical Code (NEC) standards.
The Smart Dimmer Ecosystem Checklist
Before mounting any digital switch hardware, it is essential to understand the primary architectural differences between these industry leaders:
- Lutron (Caséta Wireless Series): Renowned for its proprietary Clear Connect RF technology. It utilizes an external smart bridge hub, allowing its standard dimmers to operate flawlessly without a neutral wire connection by safely filtering a micro-current through the ground or load.
- Leviton (Decora Smart Series): Connects directly to your home’s 2.4GHz Wi-Fi router without requiring a dedicated hub. However, this direct radio integration means most Leviton models require a dedicated white neutral wire to power the internal Wi-Fi chip continuously.
Technical Wiring & Compatibility Standards
| Core Technical Feature | Lutron Caséta System | Leviton Decora Smart |
|---|---|---|
| Neutral Wire Required? | No (On standard smart models) | Yes (Required on standard Wi-Fi series) |
| Communication Protocol | Clear Connect RF (Requires Hub) | Direct Wi-Fi, Z-Wave, or Matter |
| Solid Wire Compatibility | 14 AWG or 12 AWG Copper | 14 AWG or 12 AWG Copper |
| Bulb Dimming Performance | Exceptional low-end trim adjustment | Standard programmable trim adjustment |
| Multi-Location Options | Pico Remote or Mechanical Switches | Companion Switches or Wired Remotes |
Advanced 3-Way Switch Wiring: Lutron vs. Leviton
When upgrading a standard 3-way circuit (controlling one light fixture from two different wall switches), Lutron and Leviton handle the physical traveler wires in completely different ways.
1. The Lutron Caséta 3-Way Approach (The Easy Way)
Lutron simplifies multi-location wiring by eliminating the need for physical traveler lines altogether.
- The Main Box: You install the physical Lutron Caséta dimmer in the primary electrical box containing the line and load leads.
- The Secondary Box: You disconnect the old mechanical 3-way switch, tie the traveler wires together to maintain circuit continuity, and mount a wireless Lutron Pico Remote over the wall cavity.
- The Advantage: It cuts installation time in half and allows you to add a second dimming location without running new structural cables through the drywall.
2. The Leviton Decora Smart 3-Way Approach (The Hardwired Way)
Leviton relies on a traditional hardwired structure using physical multi-conductor cables (14/3 or 12/3 Romex).
- The Main Box: You mount the primary Leviton Decora Smart dimmer in one box.
- The Secondary Box: You cannot use a standard mechanical switch. You must install a dedicated Leviton DD00R or DD0SR Companion Switch.
- The Traveler Setup: The traveler wire (typically the red conductor) acts as a data communication line, sending digital coordination signals between the primary dimmer and the companion unit.
Step-by-Step Residential Installation Manual
1. Pre-Installation Isolation Protocol
Locate your home’s main service panel and switch off the specific circuit breaker supplying power to the switch box. Remove the old wallplate and use a non-contact voltage tester directly against the switch terminals to ensure the box is completely de-energized before handling the solid copper conductors.
2. Identifying the Wire Leads (As Shown in Wiring Diagrams)
Carefully pull the existing switches forward to trace your conductor mapping. As illustrated in standard US structural mockups, modern smart hardware uses distinct branch pathways:
- Line (Hot): The incoming 120V power line from the breaker panel (strictly Black).
- Load: The output wire running directly from the switch to the light fixture (Black or Red).
- Ground: The equipment safety pathway (Solid Green or bare copper).
- Neutral (Crucial for Leviton): A bundle of White wires tucked into the back of the gang box.
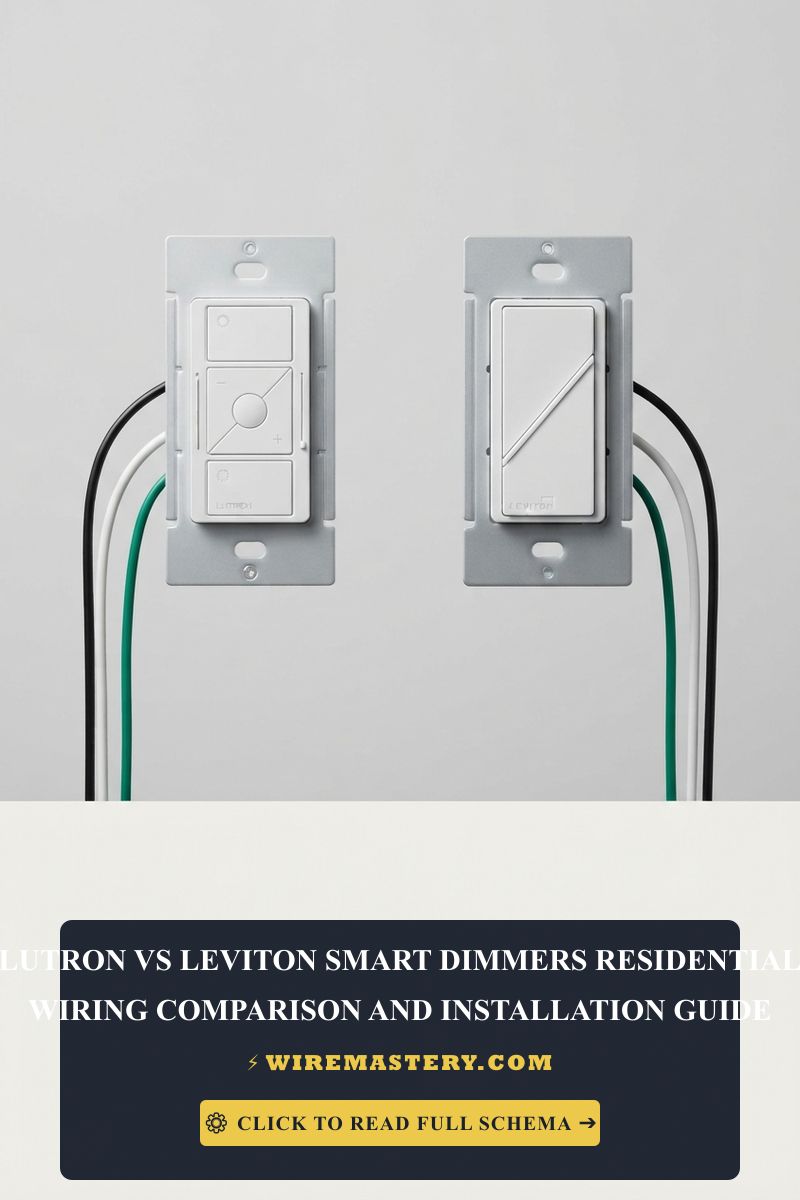
🛠️ Contractor Wiring Check: Look closely at the structural model pictured above. Note how both the Lutron device (left) and the Leviton device (right) utilize clean, solid conductor terminations following the exact NEC color codes (Black for Hot, White for Neutral, Green for Ground). If your wall box lacks the white neutral cluster, you must opt for a specialized no-neutral Leviton model or stick to the standard Lutron Caséta lineup.
3. Securing Terminations and Mounting
Strip exactly 1/2 inch of insulation from your 14 AWG or 12 AWG copper lines. Twist the wire leads securely using rated wire nuts and wrap the terminal sides with premium electrical tape to insulate the side terminal screws against the metallic box walls. Gently fold the conductors in an accordion pattern back into the wall cavity, ensuring the bare ground wire does not arc against the hot side brass screws.
Smart Ecosystem Configuration & App Setup
Once the physical hardware installation is complete, activating the smart modules requires precise network pairing.
Pairing the Lutron Caséta System
- Download the Lutron App on your smartphone.
- Connect the Lutron Smart Bridge hub directly to your home internet router using an Ethernet cable.
- Launch the app, select “Add Device,” and hold down the bottom button of the in-wall dimmer for 10 seconds until the LED lights begin to flash rapidly.
- The hub will automatically detect the Clear Connect RF signal, integrating the switch with Apple HomeKit, Alexa, or Google Assistant instantly.
Pairing the Leviton Decora Smart System
- Download the My Leviton App from your app store.
- Ensure your smartphone is connected to a stable 2.4GHz Wi-Fi network (most smart switches do not support 5GHz bands).
- Turn on the breaker. The green LED indicator on the Leviton switch faceplate should start blinking green, indicating it is in pairing mode.
- Select “Add Device” in the app and follow the on-screen prompts to input your home Wi-Fi password. The device will connect directly to the cloud without an external bridge.
Troubleshooting Common Performance Faults
- Severe LED Bulb Flickering: Smart dimmers leak a tiny amount of current to keep their smart chips alive. If your LED bulbs blink or buzz when turned off, enter the device settings app to adjust the “Low-End Trim” thresholds, or install a Lutron LUT-MLC load capacitor at the fixture.
- Device Drops Offline Frequently: For Leviton Wi-Fi switches, verify your wall box isn’t constructed of heavy metal or surrounded by dense plaster, which blocks 2.4GHz signals. For Lutron, ensure the dimmer is within a 30-foot range of your Caséta Smart Bridge.
NEC Compliance & Official Safety Standards
Adhering to the National Electrical Code (NEC) is vital for residential safety compliance. Specifically, NEC Article 404.2(C) mandates that a neutral conductor must be present at every switch location in modern residential construction to accommodate smart automation hardware safely, preventing installers from illegally using the ground wire as a current return path.
For current NFPA 70 guidance on smart-dimmer compatibility, neutral requirements, grounding, and residential lighting circuits, refer to the Official NFPA 70: National Electrical Code (NEC).
Final Summary
Choosing between Lutron and Leviton smart dimmers largely depends on your specific needs, preferences, and existing home wiring. If you are retrofitting an older home without neutral wires in the switch boxes, Lutron Caséta is the undisputed king. If your home has a dedicated neutral pathway and you prefer a hubless Wi-Fi setup, Leviton Decora Smart offers excellent flexibility. Follow proper safety checklists, respect your wire gauges, and enjoy your newly automated residential grid.