Window AC Unit Repair: Troubleshooting & Safe Hardware Fixes
Troubleshooting and restoring a malfunctioning residential window air conditioning unit requires a systematic operational framework that bridges mechanical refrigeration physics with strict low-voltage and line-voltage electrical diagnostics. Operating as a self-contained hermetic cooling matrix, a window AC unit pack integrates a heavy-duty rotary compressor, dual fan motors, and high-density heat exchanger coils inside a single compact metal chassis frame. When these units experience component dropouts—such as start capacitor degradation or control relay chattering—they do more than stop cooling; attempting to restart a locked compressor repeatedly will overheat branch circuit conductors inside your walls. For setups requiring uninterrupted backup power during utility grid anomalies, ensuring your branch lines tie into a stable uninterruptible power supply installation network protects sensitive electronic control boards against voltage surges.
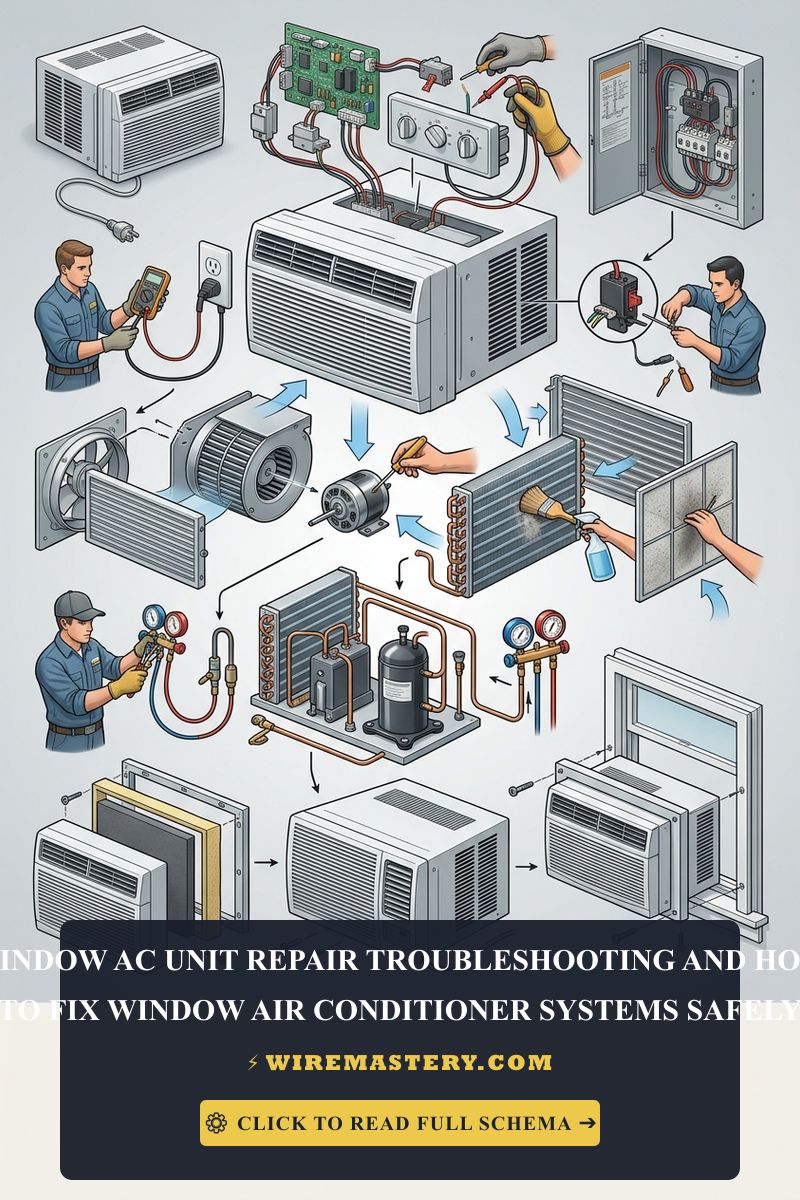
This diagnostic blueprint outlines the physical steps to safely isolate HVAC power loops, discharge high-voltage dual-run capacitors, and resolve severe compressor cycling failures in full compliance with national safety frameworks.
Core Mechanical HVAC Parameters
Before unscrewing sheet-metal shroud housings or accessing internal terminal blocks, decode these foundational thresholds:
- The Residual Capacitor Charge Hazard: Window air conditioning units incorporate heavy-duty run and start capacitors designed to provide the massive phase shift required to turn the compressor motor. These electronic components store lethal line-voltage potentials (up to 370V-440V AC) continuously, even when the appliance power cord is completely unplugged from the wall receptacle.
- The Inrush Current Threshold: During the initial fractional second when a rotary compressor launches, it draws a massive spike of current known as Locked Rotor Amps (LRA). This transient spike can double or triple the unit’s running amperage, demanding dedicated circuit headroom.
- The Short-Cycling Oil Lockout: Turning an air conditioner off and immediately back on traps high-pressure refrigerant gas inside the compressor head, preventing the motor from spinning and triggering a hard thermal trip.
Technical Materials & HVAC Diagnostic Testing Toolkit Checklist
Safely opening hermetic shrouds and testing reactive electrical components requires specific insulated field instruments and safety gear:
| HVAC Technical Tool | Primary Engineering Purpose & Safety Threshold |
|---|---|
| True RMS Digital Multimeter | category CAT III 600V minimum to measure capacitor capacitance (µF) and coil resistances. |
| Non-Contact AC Voltage Tester | Audibly monitors the wall plug perimeter to verify absolute line-voltage isolation. |
| Insulated Capacitor Discharge Tool | A specialized resistor-equipped bridge probe used to safely bleed residual voltages without sparking. |
| Heavy-Duty HVAC Fin Comb | Used to mechanically straighten bent aluminum fins on condenser and evaporator matrices. |
| ANSI-Rated Insulated Work Gloves | High-dielectric leather gloves guarding hands against razor-sharp sheet metal edges and arcs. |
Dedicated Branch Sizing & Ampacity Requirements (NEC Article 440)
Connecting a high-tonnage window air conditioning unit to an overcrowded general-use bedroom circuit is a primary cause of residential breaker tripping and progressive wire degradation. The National Electrical Code strictly regulates dedicated appliance branch circuits feeding hermetic refrigerant motor-compressor lines:
- The 80% Loading Limit (NEC 440.62): A cord-and-plug connected window air conditioner must never consume more than 80% of the total branch circuit rating if the line supplies general-use receptacles. For a standard 15-Amp circuit, the AC unit running current must stay below 12 Amps.
- The Dedicated Circuit Mandate: For large window units rated at 12,000 BTU or higher (drawing 10 Amps to 15 Amps continuous), best contractor practices demand routing a dedicated 20-Amp circuit utilizing #12 AWG solid copper conductors wrapped inside a yellow Romex jacket, isolated completely from room lighting loops.
The Core Safety Phase: Executing an Insulated Capacitor Discharge
The single most dangerous failure mode during amateur window AC unit troubleshooting is touching the terminal contacts of an undischarged capacitor. Before attaching multimeter leads to any electrical node, apply this strict trade safety protocol:
- Complete Power Disconnection: Physically pull the heavy-duty appliance plug out of the wall outlet enclosure cavity. Coil the cord away to ensure no accidental re-energization can occur during maintenance window operations.
- Accessing the Electrical Controls Gutter: Remove the plastic front trim panel assembly and back out the sheet-metal hex screws holding the internal wiring partition panel door in place. Locate the cylindrical aluminum dual-run capacitor.
- Bleeding the Voltage Residuals safely: Put on your insulated work gloves and safety glasses. Take your specialized capacitor discharge tool (or a heavy 10,000-Ohm insulated resistor wire lead). Touch one terminal probe to the Common (C) terminal block shank and the second probe to the Hermetic (HERM) terminal shank. Maintain contact for a continuous 10 seconds. Move the lead to bridge between C and Fan. This process drains out the stored current loop safely down to a true 0V AC state, allowing you to execute resistance testing without triggering arc flashes or receiving violent electrical shocks.
Advanced Hermetic Diagnostics: Compressing Coil Resistance Audits
Once you have safely executed an insulated capacitor discharge, you can use your digital multimeter to verify whether the internal motor windings of your rotary compressor are mechanically sound or permanently burned out.
The Three-Terminal Ohmic Matrix (Run, Start, & Common)
Locate the three-pin terminal block block hidden beneath the bakelite protective cover on the side of the compressor shell casing. These pins are stamped C (Common), R (Run), and S (Start).
- Rotate your digital multi-tester dial to the Resistance mode (Ohms).
- Measure the resistance parameters across all three pin combinations:
- Measure R to S: This reading must represent the absolute highest ohmic value (R_RS = R_CR + R_CS) because you are measuring through both internal motor coils in series.
- Measure C to R: This path yields the lowest ohmic value, representing the thick, low-resistance run windings.
- Measure C to S: This path yields a medium ohmic value, representing the high-resistance starting windings required to launch the rotor.
- Isolating a Hard Ground Fault: Place one multimeter probe onto the bare copper suction pipe line and touch the second probe to each of the three compressor pins. If the meter registers an active resistance value or emits a continuous beep, the internal coil insulation has collapsed and shorted to the steel casing. The compressor is dead and the entire window unit must be replaced.
🛠️ Condenser Thermal Clearance Note: Look closely at the physical framing profiles displayed inside our technical refrigeration manuals. Notice that window air conditioning units require a subtle downward tilt toward the outside rear perimeter of the window sill framing (typically a 1/4-inch to 1/2-inch drop overall). This mechanical slope forces the intense condensation water dripping off the evaporator coil to drain cleanly into the rear pan base block, where the outdoor fan slinger ring can scoop it up and splash it onto the hot condenser coils to accelerate heat dissipation safely.
Step-by-Step Window AC Restoration & Maintenance Manual
1. Advanced Evaporator and Condenser Coil Sanitization
- Remove the outer decorative plastic framework and pull the primary metal chassis completely out of its decorative window sleeve housing.
- Use a soft brush or a high-foaming alkaline HVAC coil cleaning spray to coat both the indoor evaporator and outdoor condenser aluminum fin faces. Let the solvent dissolve grease and dust mounds for 15 minutes.
- Rinse the fins gently using a low-pressure water hose stream or a pressurized spray bottle. Never utilize a heavy commercial pressure washer, as high-impact water streams will instantly smash and bend the fragile aluminum fins, permanently choking airflow and causing immediately high-pressure system failures.
2. Restoring Bent Fins with a Calibrated Fin Comb
If years of outdoor hail impacts or rough installations have flattened sections of your aluminum cooling fins:
- Match the teeth spacing of your HVAC fin comb tool directly to the specific fins-per-inch (FPI) rating of your unit’s coil matrix.
- Insert the tool jaws clean at the bottom of the un-damaged fin track and pull straight upward with slow, steady friction. The plastic fingers will mechanically realign the bent channels, restoring proper airflow thermodynamics across the refrigeration lines.
Troubleshooting Common Window AC Failures
- The Fan Runs but the Compressor Clicks and Fails to Start: This behavior indicates a faulty dual-run capacitor or a locked compressor rotor. Use your multimeter’s capacitance setting (µF) to check the component. If a 35µF capacitor registers below 31.5µF (violating the standard ±5% threshold), it can no longer supply the phase shift needed to turn the motor. Replace it immediately with an identical model.
- The Indoor Evaporator Coil Freezes into a Solid Ice Block: This indicates an active airflow choke or a low refrigerant charge state. Inspect your primary air filter; if dust mats block the screen, the air cannot transfer heat to the cold coils, dropping temperatures below freezing. Clean the filter. If the filter is clean and the fan runs at full speed, the unit has a capillary tube restriction or a structural freon leak that requires professional replacement.
- Water Drips Copiously Inside the Living Room: This indicates a backwards structural frame tilt or a clogged drain path. If the unit tilts inward toward the bedroom, or if algae sludge blocks the connecting ports between the front pan and the rear reservoir, condensation will overflow the front plastic casing. Clear blockages using your wet/dry shop vacuum and adjust the window side casing jacks to restore the mandatory rearward slope.
National Electrical Code Infrastructure & Safety Regulations
Adhering to strict national structural regulations protects your home infrastructure from electrical fires and ensures full property insurance compliance. The National Electrical Code strictly regulates heavy-duty room air conditioners under NEC Article 440 (Air-Conditioning and Refrigerating Equipment):
- Disconnecting Means Compliance (NEC 440.14): Every appliance operating a hermetic refrigerant compressor must feature an easily accessible physical disconnecting switch located within clear line-of-sight of the hardware unit. For standard window air conditioners, an officially listed, heavy-duty appliance attachment plug receptacle fulfills this mandate perfectly, provided it remains un-obstructed by furniture or curtains.
- LCDI Protective Power Cord Mandates (NEC 440.65): All factory single-phase window AC units must ship with an integrated Leakage Current Detection and Interruption (LCDI) protective device attached directly to the power plug head. This internal chip monitors current balancing between the hot and neutral tracks; if moisture infiltrates the wire sheath or an insulation fault occurs, the plug cuts line voltage instantly to prevent fatal residential shock paths.
For the NFPA 70 provisions relevant to this guide on Window AC Unit Repair: Troubleshooting & Safe Hardware Fixes, consult the Official NFPA 70: National Electrical Code (NEC).
Conclusion
This article explains window AC unit operation parameters, executing insulated capacitor discharges, and running multi-tester ohmic audits transforms complex climate faults into safe, systematic solutions. By checking compressor coil balances, cleaning aluminum cooling fins with correct safety thresholds, and ensuring absolute compliance with NEC Article 440 dedicated circuit loading limits, you build a resilient and code-compliant residential ecosystem. For final checks, complete appliance line power de-energization checks, utilize CAT III multimeters, and execute every maintenance phase with precision.